Does Sharing Files With a Friend Have to Be So Hard?

Contents
- Introduction
- The Candidates
- The Solution
- So How Does This Work?
- Installating the Server
- Browsing Files
- The System Menu
- The File Menu
- Using the Slide Show
- Configuration
- Future Plans
Introduction

Being a tech guy who constantly has new gadgets and apps, I can't recall how many times some version of the above phrase has been said to me at parties, meetings, or even waiting for the subway.
However, I can definitely recall how many times we ended up with the following exchange:
| Me | Sure! What do you use? |
|---|---|
| Friend | Well, I have app A. |
| Me | Hmm... I don't have that. Do you have app B? |
| Friend | No, I don't have that either. Do you have method C? |
| Me | Okay. Let's try that. Hmm... it's not connecting. How about we use method D? |
| Friend | That's not working either. |
Sharing a file has been a common task since computers became a thing back in the dark ages. First, eager programmers happily looked at each other's printouts, then it became copying punch cards. Afterwards, magnetic disks became the new hot trend, then the technology moved to optical disks, flask drives, and wireless transfers.
However, it seems like we are still at a stage where after 70 years, we can't easily share cute shiba videos without jumping through hoops, downloading strange apps, or resorting to slow wireless transfers.
How about we try something different?
The Candidates
But Jim, I share files every day with no problems, you say?
Well, let's look at the common methods that people use to transfer files.
| Method | Fail |
|---|---|
| 1. AirDrop | Can you AirDrop to an Android phone? Okay then! |
| 2. NearBy Share | Can you NearBy Share files to an iPhone? Hmm... |
| 3. AirDroid, SHAREit, Resilio Sync, Send Anywhere, etc... | Are you going to tell someone at a bus stop to quickly install the same app as you just so they can receive a file? Alrighty then! |
| 4. Chat Program | Many chat programs restrict what types of files you can send, recompress your HD videos, and you have to wait for the file to slowly upload and then download to your friend's device. We also run into the problem of method 3 where you have to have the same chat program installed in order to transfer files. |
| 5. Bluetooth | Even with Bluetooth 5, transferring a 700MiB HD video is like watching paint dry in humid Florida weather. |
| 6. Email | Most email services limit attachment size, and it's even slower than transferring through chat programs. However, I have always found the stories of iPhone users emailing files to themselves just so they could print a document rather amusing. ;) |
| 7. DropBox, OneDrive, etc... | Runs into the same upload/download issues as methods 3 and 4. |
| 8. USB Flash Drive | Actually pretty do-able and quick, but you have to remember to carry one around and also have the right adapter to interface with your friend's device. I myself keep one in my pockets at all times, but it's rather hit and miss whether the device of the person that you're sharing with will support your drive. |
| 9. Have your friend take a picture/video of your phone screen with his/her phone camera! | 100% success rate at transferring bad quality data! |
Things are not looking great for us at the moment, are they?
The Solution
So in short, in order to be an efficient, universal solution, we need something that
- Can be used on every device
- Supports direct WiFi transfers without uploading to a server and back
- Won't recompress our 4K video into 480p.
- Works where we can't even get a phone signal
Now, if only there was something that came preinstalled on every device, is designed to access other computers with a commonly accepted protocol, and has the ability to upload/download files...
Something...
like...
a...
web browser!

So How Does This Work?
So how does a web browser work to transfer files?
There are three basic steps.
- Have both devices connect to the same wireless network/hotspot
- Let your friend type in the address of your device in their browser
- Browse, view, download, and upload as much as you want

The advantages of this approach are
- Works on any device that has a web browser (i.e. pretty much everything nowadays)
- You don't have to click on every file individually, press send, and wait for your friend to accept. Your friend can look to see what they want and download files by themselves.
- You can have a whole group of people browsing at the same time instead of one by one.
Of course, this server won't run on iPhones and iPads, because not only does Apple restrict access to the filesystem on iOS devices, but you also can't run Linux programs unless you're rooted with Cydia.
Fortunately, all you need is *one* device to run the server, so your Apple friends can still connect to your Android phone without any problems and still download and upload files. Besides, they're already used to not being able to use other systems since AirDrop only works for Apple devices. ;)
Installing the Server
For speed and efficiency, the Pafera File Server is a Linux/Windows app written in Rust, so unfortunately, you can't just download it from the app store. I might make an app store version in Kotlin later if someone is willing to pay me for it, but unless you're Jerry Maguire, you'll have to settle for the Rust version for now.
Fortunately, many open source programmers much more intelligent than myself have gotten together to create apps that lets you run Linux programs on your Android phone with varying levels of success.
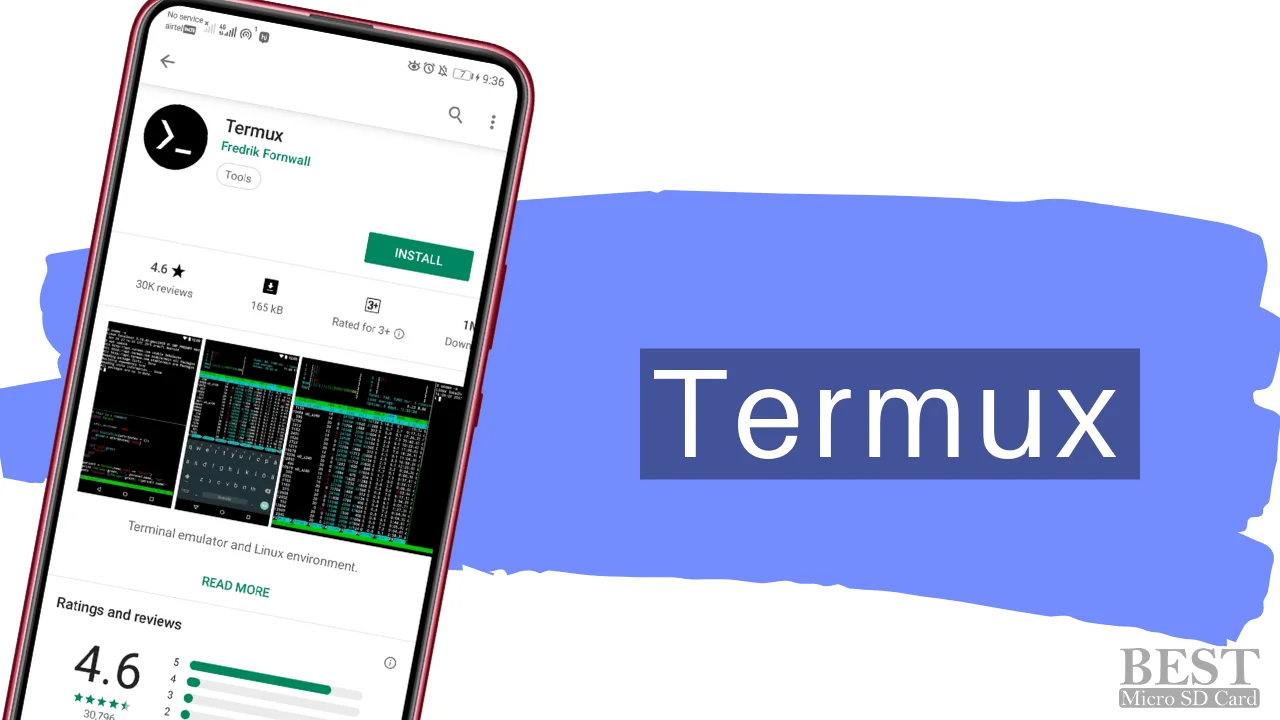
Therefore, all you have to do is to install Termux on your phone, copy and paste two commands, and push Enter a couple of times. It's not a one click install, but it isn't SpaceX building StarShip either, and you'll gain access to a whole other ecosystem of cool programs to play with.
Installation is thus as follows:
- Download the Termux app from F-Droid or from Codeberg
- Start the app
-
Copy and paste the following into the terminal and press enter.
curl -O https://pafera.com/installfileserver.sh -
Copy and paste one more command into the terminal and press enter.
bash installfileserver.sh - Press Enter on your keyboard for any prompts that come up during the package upgrade process.
-
Have your friend type in the URL shown on screen.
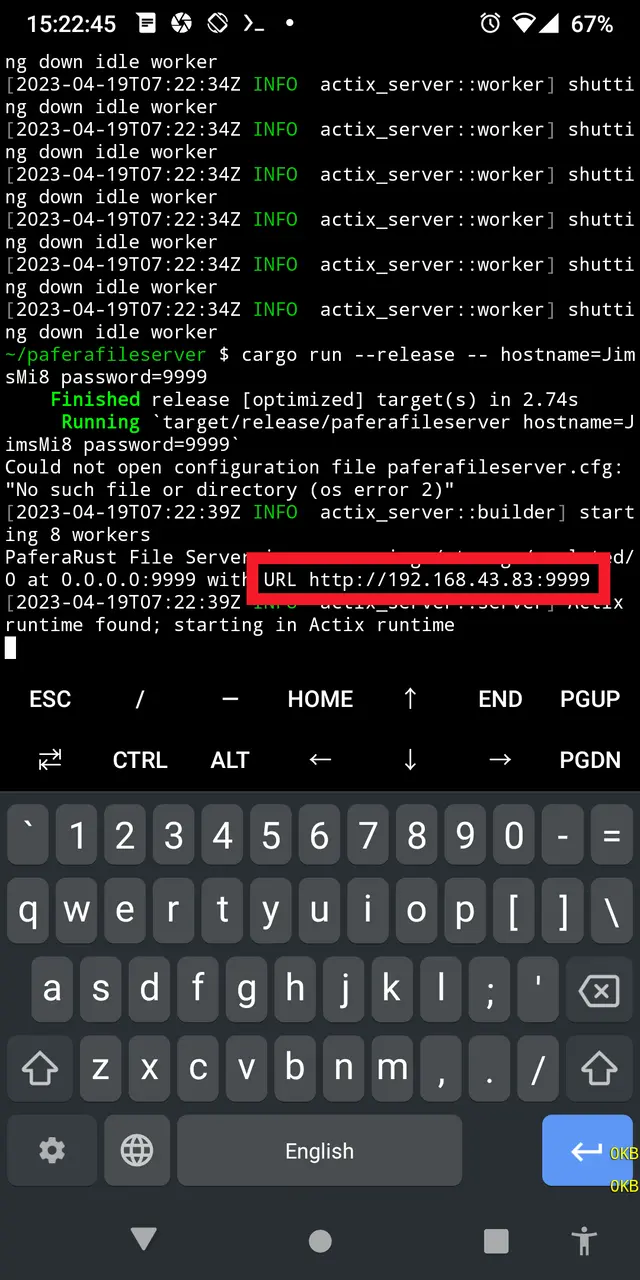
Finding the URL among the display
Now, once you've installed the server, you can quit any time simply by exiting the Termux session.
And if you want to start the server up again with a password that allows changes, then type
./paferafileserver password=yourpasswordhere
into Termux, or just press the up arrow to choose your previously typed commands.
Not quite as easy as just pulling down your notifications and tapping "NearBy Share," but you also won't run the server by accident, and you get a lot more functionality for your troubles.
If you happen to be a Rust programmer, then installation is much easier for you.
All you have to do is to type
cargo install paferafileserver
Wait for cargo to do its thing, and voila! You're done!
If you want to run Pafera File Server on Windows or Linux, prebuilt binaries are available below in 7-Zip archives.
Browsing Files
Once your friend manages to type the URL of your server into his or her browser, their phone should look something like this.

If you don't see any files, make sure that your friend has enabled JavaScript, as we use scripting for sorting and displaying files.
As a quick primer, starting from the top left is the system menu button, the recent files button, and the home directory button.
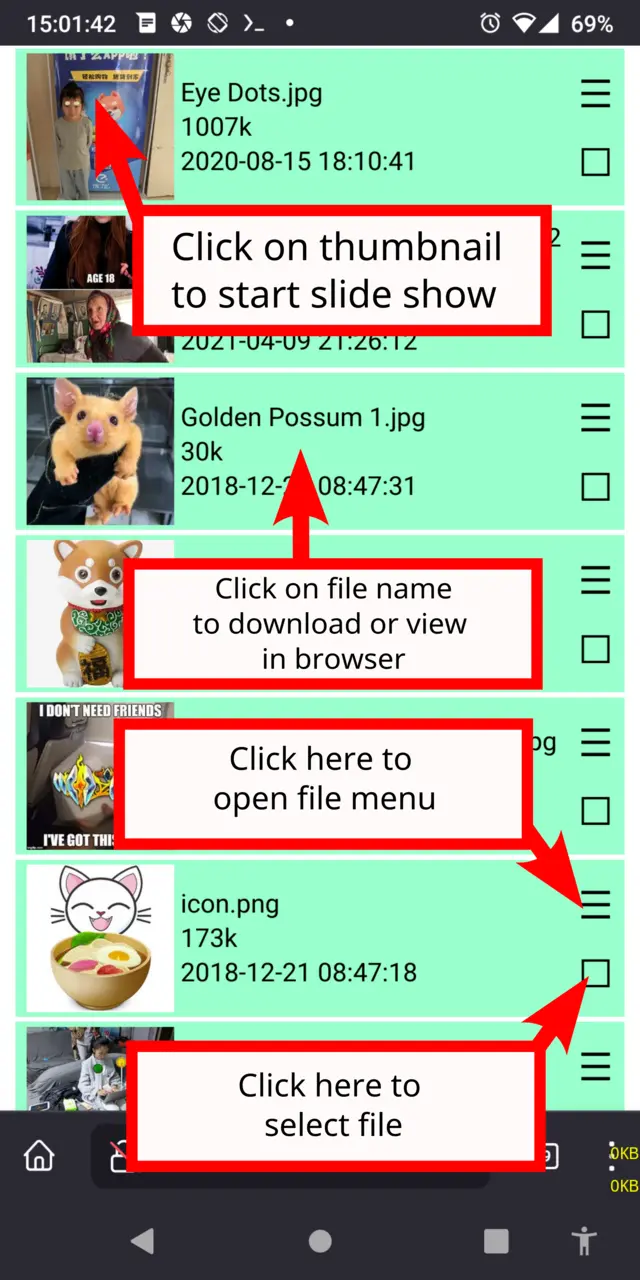
Clicking on any image thumbnail will start a slide show, while clicking on the file name will download the file.
Clicking on the menu button for a file will open the actions menu for that file, while clicking on the square beneath it will select the file.
To quickly select a range of files, click on the select button for the first file, then click on the menu button for the last file and choose "Select to Here".
The System Menu
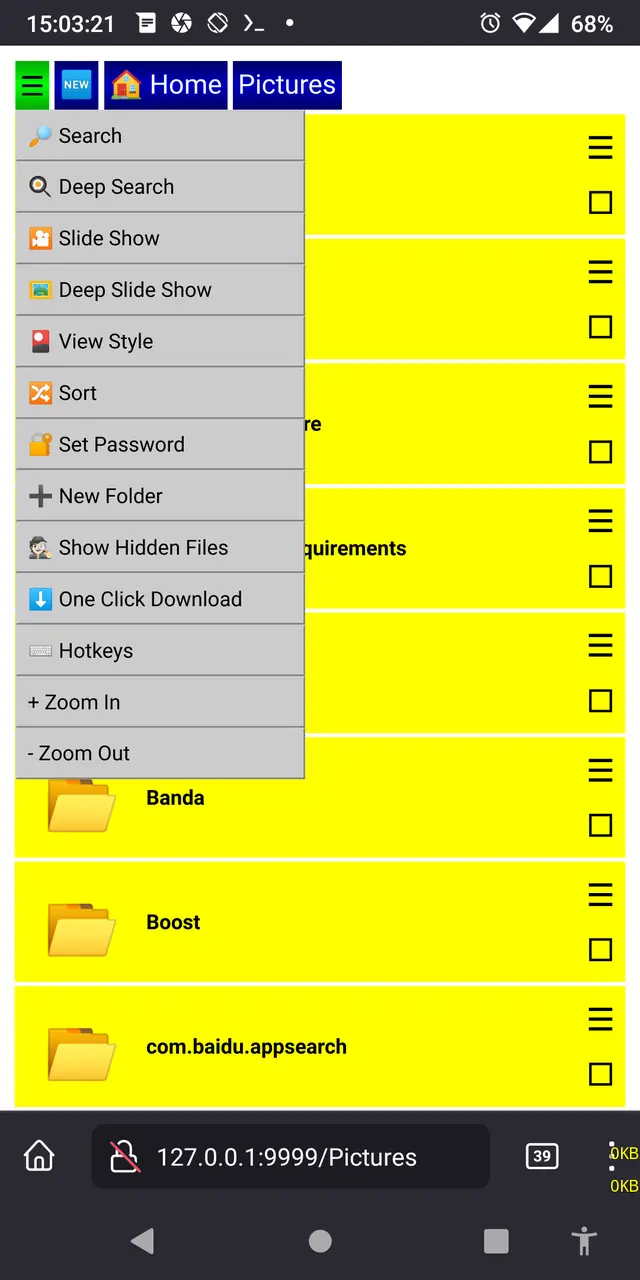
Search and Deep Search (Hotkeys t and f) both allow you to type a couple of letters and see all of the files which contain those letters.
The difference is that normal Search only looks at the files in the current folder while Deep Search looks in all folders inside this folder as well.
Slide Show and Deep Slide Show (Hotkeys z and x) follow the same logic. Choose the one that you want based upon whether you want to include images in all folders inside this folder or not.
Toggle View (Hotkey v) changes from the normal details view to an icon view of all of the images and videos inside this folder.
Sort (Hotkey s) lets you pick how the files are ordered. You may choose from using the file's name, size, date, and time difference to sort the files. I personally prefer the time difference view, as "Five minutes ago" is much more useful to me than "14:55".
The Recent Files view (Hotkey e) will show you the most recently changed 512 files inside the current folder and all folders inside this one. Be careful using this view for your home folder, as it may take a while to check all of the files if you have hundreds of thousands of small files to inspect.
Set Password (Hotkey w) will let your friend type the password in order to modify, upload, and delete files. Without this password, no one can change anything on your phone, so keep it safe. You can set it either on the command line by typing password=yaddayaddayadda or in paferafileserver.cfg using the format
{
  "password":"yaddayaddayadda"
}
New Folder (Hotkey o) will prompt you for the name of the new folder to create inside of the current folder.
Show Hidden Files (Hotkey i) will toggle display of files and folders starting with periods, which is what Unix uses to indicate that these files should not normally be visible to the user.
Turning on One Click Download (Hotkey k) will let you instantly download a file by clicking on it instead of displaying in your browser.
Show Hotkeys (Hotkey h) will show you what keys can be used in both folder view and slide show view.
Zoom In (Hotkey .) and Zoom Out (Hotkey ,) will change the size of everything on the screen. Use these to customize your page if your system's default sizes are not to your liking.
The File Menu

Select to Here lets you select all of the files between the ones that you've previously selected and this time. It's quite handy as a replacement to avoid replacing the right click menu for copying links on both desktop and mobile.
Select All (Hotkey a) and Select None (Hotkey n) are self explanatory. Just be careful when using them to delete all files that you really want to delete all files.
Send (Hotkey g) will open up a scan window where you can see all of the other devices running Pafera File Server on your network.
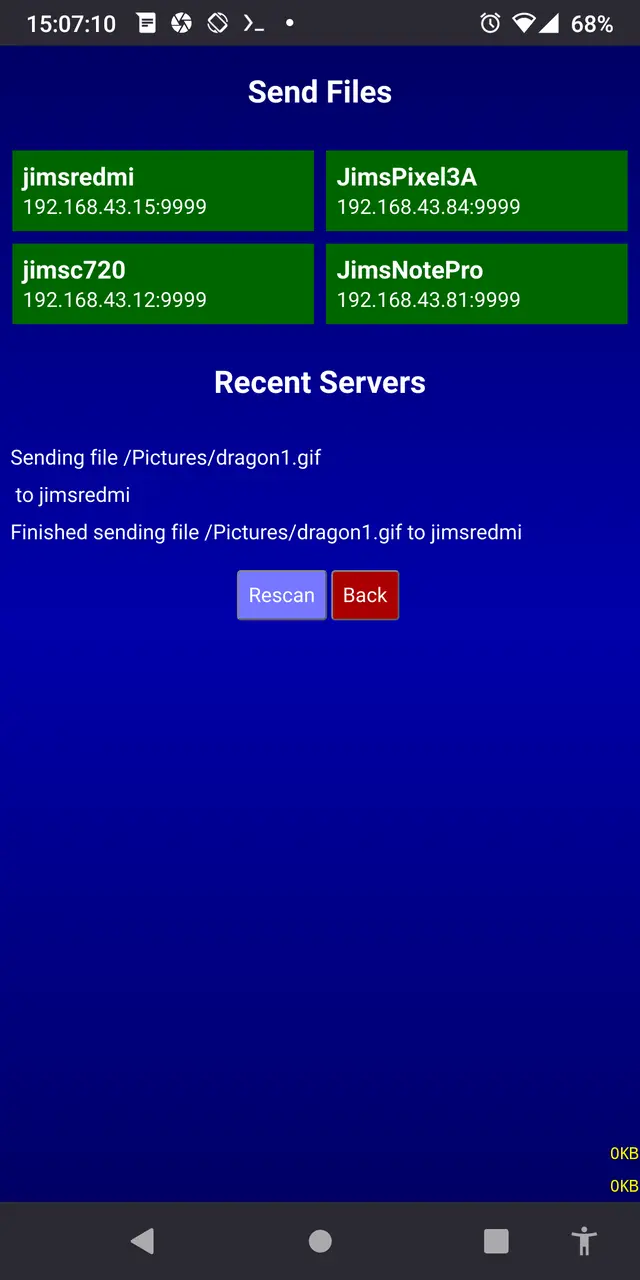
Note that all devices must be on the same subnet and running on the same port, so if you're on 192.168.0.100 and the device that you're trying to send to is on 192.168.1.100, then the scanner won't detect the other device. Of course, you can always just login to that device's server and upload files using your browser instead.
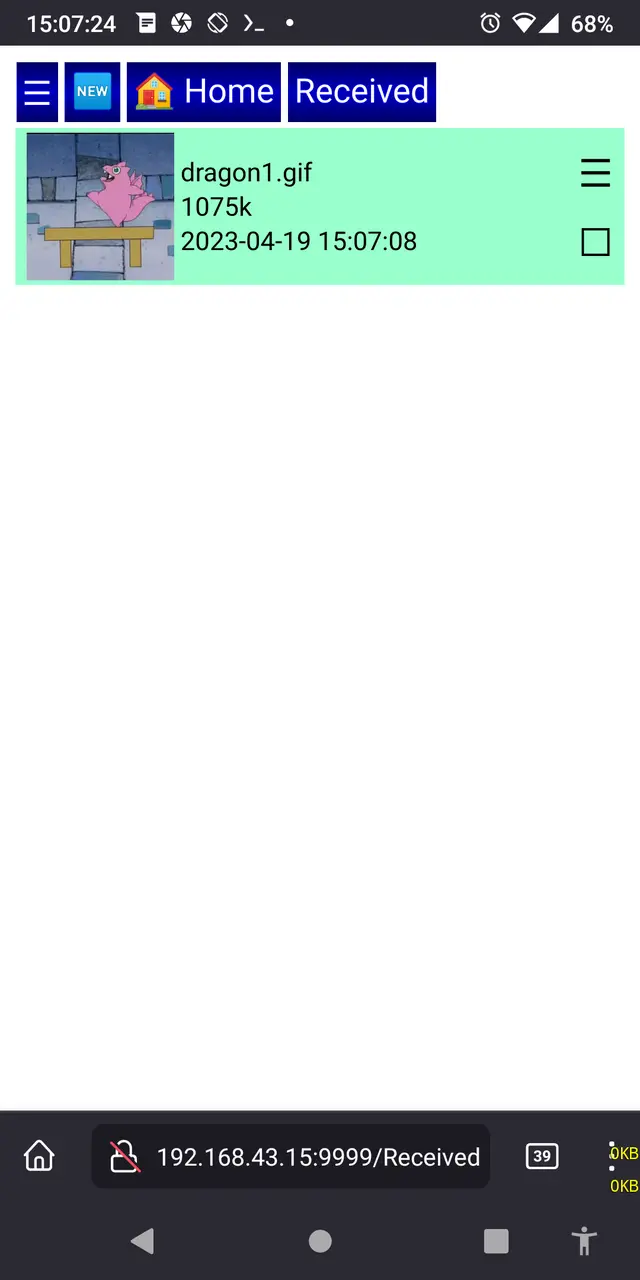
For simplicity, all files that you send to another device are collected in a folder called "Received" under the server root. I might change this later, but as for now, it's handy to have all new files appear in the same folder where you can move them to the appropiate place later.
Download (Hotkey l), Rename (Hotkey r), Move (Hotkey m), Copy (Hotkey c), Delete (Hotkey d), and Permanent Delete (p) all are able to work on multiple files at the same time except for download on mobile browsers where you can only download one file at a time. Just be careful, because Permanent Delete really mean Permanent Delete. Always store a copy of your important files on another device before you touch the delete button.
Undelete (Hotkey u) is only used for files which have been deleted one time and thus have the ".deleted" extension. It cannot bring back permanently deleted files. Those are not pining. They've passed on. Those files are no more. They are ex-files.
Using the Slide Show
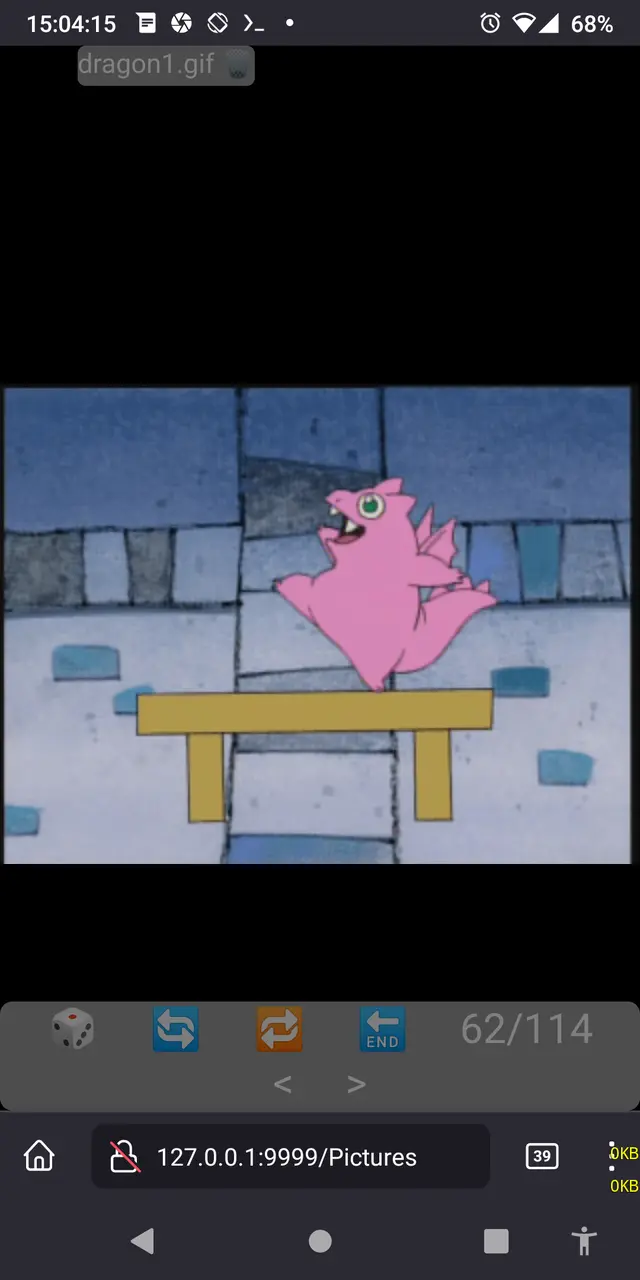
Among the top features that people always ask for in a file browser is a good slide show. When you carry around 6,000 pictures of your son on your phone to show off to random strangers, it's not hard to see why. ;) Most SMB clients don't have image previews or slide shows, so trying to find one certain image using the iPhone Files app is rather frustrating to use.
The Slide Show feature in Pafera File Server can be activated in a couple of different ways:
- Click on the thumbnail of an image.
- Select "Slide Show" from the system menu.
- Select "Deep Slide Show" from the system menu.
- Do a search or deep search to choose the files that you want to show off, and then click on the thumbnail of the first image.
Regardless of how you start the slide show, there will be a delete button on the very top with the name of the current image, and a toolbar on the bottom containing randomize, rotation, exit, forward and backwards functions.
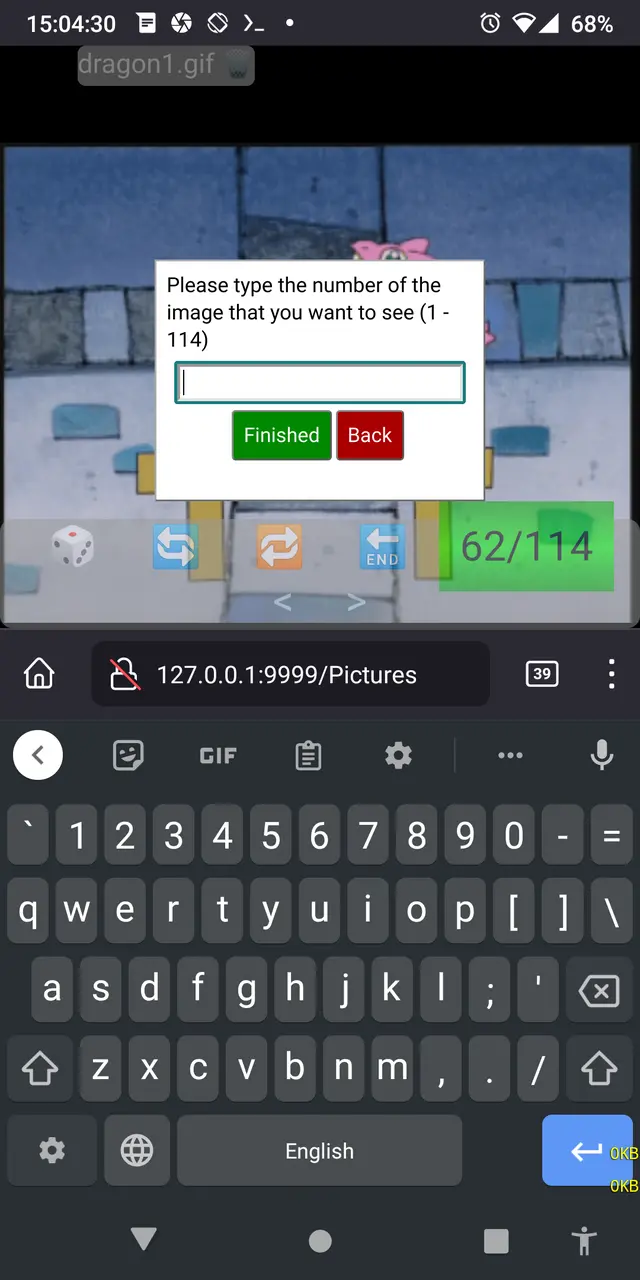
If you want to go to a certain image number, just click on the image position on the toolbar, type the number that you want, and go from there.
The slide show supports swipe gestures, which are actually my preferred method to navigate on the phone. All you have to do is to swipe your thumb slightly to the left to go to the previous image, right to go to the next image, up to delete the current image, or down to exit the slide show.
If you're on a laptop or have a bluetooth keyboard hooked up to your phone though, using the slide show becomes even easier.
| Left Arrow | Previous image |
|---|---|
| Right Arrow | Next image |
| Up Arrow | Delete image |
| Down Arrow/Escape | Exit slide show |
| r | Random image |
| g | Go to image number |
| q | Rotate 90 degrees counterclockwise |
| e | Rotate 90 degrees clockwise |
Configuration
Pafera File Server may be configured from a JSON file named paferafileserver.cfg in the same folder, or from command line arguments in the form key=value. If both are specified, then the command line arguments will override the configuration file settings.
A common command line is
paferafileserver [hostname=localhost] [serverroot=/home/jim] [password=password] [ip=0.0.0.0] [port=9999]
Thus, if you wanted to serve Jim's Pictures directory to all visitors on port 5000, you would use
paferafileserver serverroot=/home/jim/Pictures port=5000
If you don't specify serverroot, it will default to your home directory.
If you don't specify ip and port, it will default to 0.0.0.0:9999.
Additionally, the following options can be typed on the command line to disable certain functionality even if the user has the right password.
disabledelete
disablerename
disablemove
disablecopy
disablenewfolder
disabledelete
disablepermanentdelete
disablesend
disableupload
All command line arguments can also be specified in a JSON file called paferafileserver.cfg in the current folder such as
{
  "hostname":               "JimsLaptop",
  "password":               "SecretPassword12345",
  "disabledelete":          1,
  "disablepermanentdelete": 1
}
You may choose whichever method works best for you.
For Windows, it is often easiest to create a shortcut to the executable and specify your arguments in the shortcut.
For Termux on Android, the easiest way to launch the executable is to install the Termux Widget app from F-Droid and configure your command line inside the widget's script.
Future Plans
Further changes are not planned at this time since this was just a fun introductory project to play around with Rust, but if someone else were to
- Write Kotlin/Swift versions to toss up on the app stores
- Translate this app for multiple languages
- Create various CSS themes
- Implement a rsync like algorithm for backup and restore
- Or anything else that you could think of
I would certainly welcome any additions to this simple project.
As always, I hope that you guys find this app useful, and if you want to customize it for your own purposes, I'm always available as a technical consultant. Have fun!
About the Author |
|

|
Jim has been programming since he got an IBM PS/2 back during the 90s. To this day, he still prefers writing HTML and SQL by hand, and focuses on efficiency and correctness in his work. |